Remote Jupyter Notebook
Since it’s foundation in 2015, Jupyter notebooks became the De facto standard for data manipulation and visualization. You can write code and annotate it with Markdown, HTML or even LaTeX.
Jupyter notebooks are not only for python, you can install additional community supported kernels for other programming languages like JavaScript, Scala or even C++ (yes, even compiled languages).
Google Colab#
Google offers limited CPU, GPU and TPU time on their infrastructure free of charge.
At the time of writing, they offer:
- 12GB RAM
- 1 CPU
- NVIDIA Tesla K80
- TPU
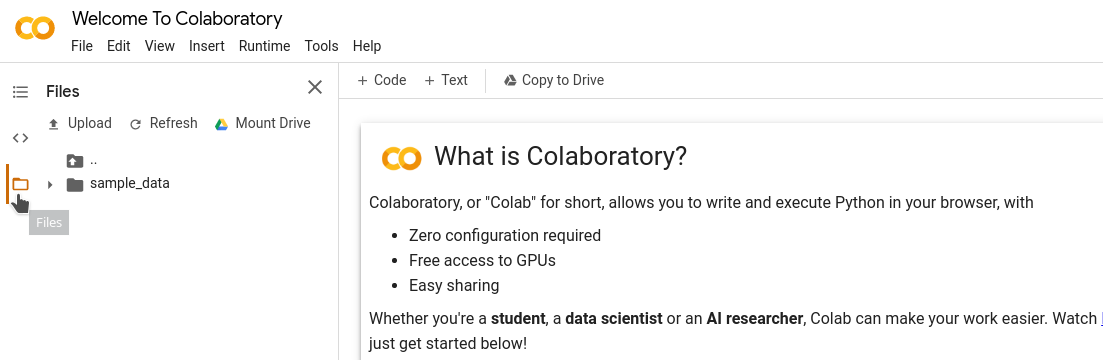
Open Google Drive and from right-click menu More -> Connect more apps.
Search for Google Colaboratory.
Now you can create new notebooks in your Google Drive.
You can also access your files in Google Drive from inside the notebook. but first you have to mount it.
On left sidebar click on Files -> Mount Drive.
Paperspace#
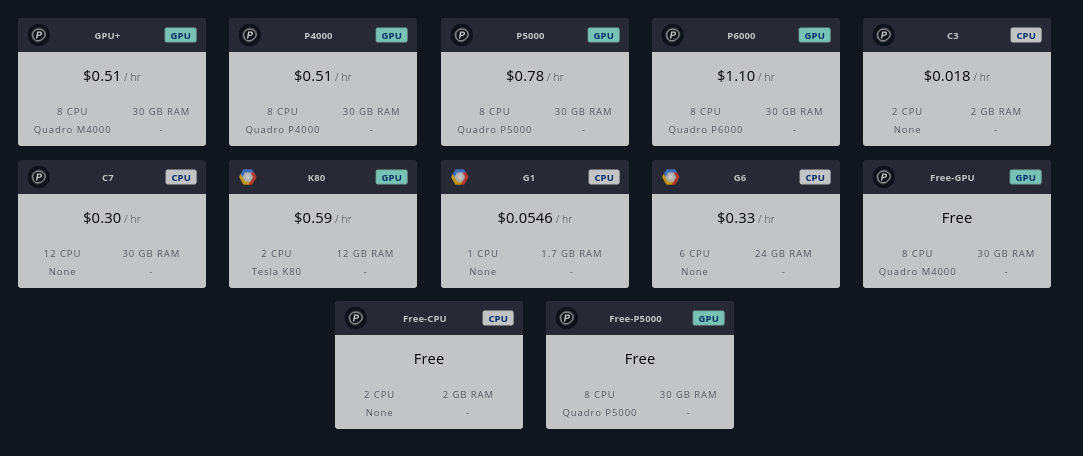
Under their Gradient° option, Paperspace offers a more generous notebooks for less time (6 hours) but you create new one after the previous one expired if they have available resources to spare.
Make sure to keep all your work in the storage folder in order for the changes made to persist across different notebooks.
At the time of writing, they offer:
- 30 GB RAM
- 8 CPU
- NVIDIA Quadro P5000
Your Own Server#
You always have the option to rent your own server from any cloud provider and customize it to your taste (and budget).
Here is a step-by-step guide on how to setup a quick notebook:
After you install python on your server you can install Jupyter through pip
$ pip install jupyterlab
Or download and install Anaconda which already comes with jupter pre-installed.
$ wget https://repo.anaconda.com/archive/Anaconda3-YYYY.MM-Linux-x86_64.sh
Make the script executable
$ chmod +x Anaconda3-YYYY.MM-Linux-x86_64.sh
Run it
$ ./Anaconda3-YYYY.MM-Linux-x86_64.sh
A very helpful wizard will ask you to accept the license and choose a location for the install directory.
Careful not click ENTER mindlessly. Last option asks you if you want to add the previously mentioned location to $PATH environment variable. the default is no, but i recommend typing yes.
Do you wish the installer to initialize Anaconda3
by running conda init? [yes|no]
[no] >>> yes
If you didn’t, you can edit $PATH variable to add the anaconda’s directory as the first path, in my case I installed it in /root/anaconda3.
$ echo $PATH
/usr/local/sbin:/usr/local/bin:/usr/sbin:/usr/bin:/sbin:/bin:/usr/games:/usr/local/games:/snap/bin
$ export PATH=/root/anaconda3:$PATH
If you type jupyter in your terminal and the usage instructions appeared, then everything this far is working as intended.
Next step is to generate a jupyter config file.
$ jupyter notebook --generate-config
This will create a config file in the ~/.jupyter/ called jupyter_notebook_config.py. Now open it with your favorite text editor and edit and uncomment few stuff.
Use ‘*’ to allow any origin to access your server not just localhost.
c.NotebookApp.allow_origin = '*'
Change the allow_remote_access from False to True, Unless you want access the notebook through an SSH Forwarding.
c.NotebookApp.allow_remote_access = True
You can open a SSH tunnel without restarting your session using this escape sequence (sometimes called SSH Konami Code)
- Press the SHIFT key. (and keep pressing)
- Press the tilde (~) key.
- Press the letter C.
- Un-Press the SHIFT key.
A special SSH prompt will appear
ssh> help

Commands:
      -L[bind_address:]port:host:hostport    Request local forward
      -R[bind_address:]port:host:hostport    Request remote forward
      -D[bind_address:]port                  Request dynamic forward
      -KL[bind_address:]port                 Cancel local forward
      -KR[bind_address:]port                 Cancel remote forward
      -KD[bind_address:]port                 Cancel dynamic forward
This will bind port 8888 on the server to port 8888 on your machine.
ssh> -L 8888:localhost:8888
Change the allow_remote_access from False to True, Unless you want access the notebook through an SSH Forwarding.
c.NotebookApp.allow_remote_access = True
This enables you to server your Notebook over HTTPS (highly recommended for security).
-
You can generate your own self-signed SSL certificate but this will make your browser show a warning everytime you visit your notebook (since the browser doesn’t recognize the issuer of the certificate).
$ openssl req -x509 -nodes -days 365 -newkey rsa:2048 -keyout mykey.key -out mycert.pem -
You can generate a free certificate from Let’s Encrypt , they offer certbot a very handy tool that automates the process of creating the certificate.
-
After that put the path of the certificate file, CA file and key file here
c.NotebookApp.certfile = ''
c.NotebookApp.client_ca = ''
...
c.NotebookApp.keyfile = ''
Let the server accept connections from any IP instead of just locahost.
c.NotebookApp.ip = '*'
The port the notebook server will listen on.
Make sure to use port 443 if and only if you have set a SSL certificate and instead to use HTTPS.
c.NotebookApp.port = 80 # (443)
Here you can specify a directory as a starting point for your notebook. I like to create a workspace folder and keep everything in it.
This makes backup process easy as you only have only directory to worry about.
c.NotebookApp.notebook_dir = '' # (/root/workspace)
We don’t need a browser tab to open (on the server side) whenever we run jupyter.
c.NotebookApp.open_browser = False
Assuming multiple parties are going to use this notebook server, set quit button to False to avoid accidental shutdown of the server.:
c.NotebookApp.quit_button = False
Feel free to change anything else according to your own needs. Then save your changes and run the jupyter and copy token.
$ jupyter notebook
    ...
    http(s)://[ip]:[port]/?token=[token]
    ...
Type in the IP of your server in your browser and you will be greeted with a window asking your a token to setup the password. paste the token under the Setup a Password bottom section and type new password.
Later on, the server will only ask you for the password.

Congratulations, your own jupyter server is ready.
Go create notebooks that will change the world.